How to See Your Latest Website Changes (Clearing Cache)
Have you recently updated a post, added an event, or made other changes to your website, but they're not appearing when you visit the page? Don't worry, this is a very common issue, and it's usually due to caching.
Caching stores a temporary copy of your website to help it load faster for visitors. Sometimes, this "old" copy gets shown instead of your fresh updates. To fix this, you need to "clear the cache."
There are a few places where your website's information can be cached. We'll walk you through clearing the most common ones:
Step 1: Log in to Your WordPress Dashboard
- Open your web browser (Chrome, Firefox, Safari, Edge, etc.).
- In the address bar, type your website's login URL. This is usually
yourwebsite.com/wp-admin(replaceyourwebsite.comwith your actual website address). - Enter your Username or Email Address and your Password in the provided fields.
- Click the "Log In" button.
You should now be in your WordPress Dashboard.
Step 2: Clear Breeze Cache (from WordPress Admin Bar)
Breeze is a caching plugin for WordPress that helps your website load faster. It creates different types of cache. The quickest way to clear Breeze's cache is often directly from your WordPress dashboard's admin bar.
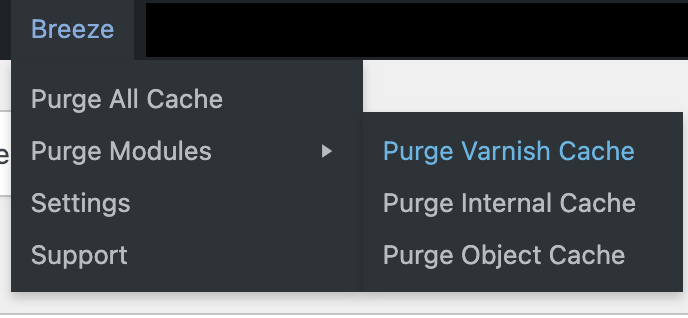
- Once logged into your WordPress dashboard, look for the "Breeze" menu item in the black admin bar at the very top of the screen.
- Hover your mouse over "Breeze".
- You'll see a dropdown menu. Click on "Purge All Cache".
- Next hover over "Purge Modules". Click on "Purge Varnish Cache", "Purge Internal Cache", "Purge Object Cache"
Step 3: Check Your Website
After clearing both the Breeze/Varnish cache, visit the page where you expected to see your changes.
- Refresh the page in your browser (Ctrl+R on Windows, Cmd+R on Mac, or click the refresh icon).
- If you're still not seeing the changes, try opening your website in an Incognito Window (Chrome) or Private Window (Firefox/Safari/Edge). This ensures no lingering browser cache is interfering.
Step 4: If your changes are still not showing you may need to clear your personal browser cache
Your browser stores copies of websites you visit to load them faster next time.
For Google Chrome:
- Click the three vertical dots (or a similar menu icon) in the top-right corner of your browser window.
- Go to "More tools" and then select "Clear Browse data...".
- In the pop-up window:
- Set the "Time range" to "All time" (or at least since you made your changes).
- Make sure "Cached images and files" is checked. You can uncheck other options like "Browse history" and "Cookies" if you don't want to clear them.
- Click the "Clear data" button.
- Important: After clearing, try visiting your website page again. You might need to refresh the page (Ctrl+R or Cmd+R, or the refresh icon in your browser).
For Mozilla Firefox:
- Click the three horizontal lines (menu icon) in the top-right corner.
- Go to "History" and then select "Clear Recent History...".
- In the pop-up window:
- Select "Everything" for the "Time range to clear."
- Expand "Details" and make sure "Cache" is checked.
- Click "OK".
- Important: After clearing, try visiting your website page again. You might need to refresh the page.
For Apple Safari:
- Click "Safari" in the top menu bar.
- Select "Clear History...".
- Choose "all history" from the dropdown menu.
- Click "Clear History".
- Important: After clearing, try visiting your website page again. You might need to refresh the page.
For Microsoft Edge:
- Click the three horizontal dots (or a similar menu icon) in the top-right corner.
- Go to "Settings".
- Click on "Privacy, search, and services" in the left sidebar.
- Under "Clear Browse data," click "Choose what to clear".
- Set the "Time range" to "All time".
- Make sure "Cached images and files" is checked.
- Click "Clear now".
- Important: After clearing, try visiting your website page again. You might need to refresh the page.
Step 5: Check Your Website Again
After clearing both your browser cache and the Breeze/Varnish cache, visit the page where you expected to see your changes.
- Refresh the page in your browser (Ctrl+R on Windows, Cmd+R on Mac, or click the refresh icon).
- If you're still not seeing the changes, try opening your website in an Incognito Window (Chrome) or Private Window (Firefox/Safari/Edge). This ensures no lingering browser cache is interfering.
If your changes still aren't showing it may be due to CDN cache (Cloudflare), internal Server Cache or a plugin conflict. Please email our support desk for more assistance. website.support@causeinspiredmedia.com